Features
If you haven’t, create a superuser with the Django createsuperuser command. Login with the admin user, and select Drips to manage them. You will be able to:
View created drips.
Create a new drip.
Select and delete drips.
Now you can also manage campaigns, select Campaigns to manage them. You will be able to:
- View created campaigns.
- Create a new campaign.
- Select and delete campaign.
Create Campaign
Click on the ADD CAMPAIGNS + button to create a new Campaign. In the creation you need to define the email that you want to send, the campaign the Drip belong to and the queryset for the users that will receive it. To see more details, click here.
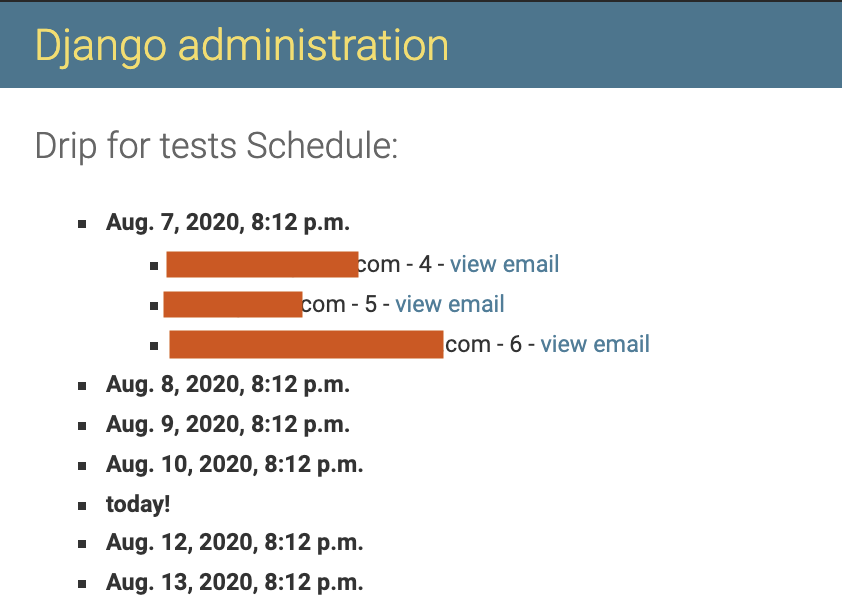
View timeline of a Campaign
In the django admin, you can select a campaign and then click on the VIEW TIMELINE button to view the emails expected to be sent with the corresponding receivers grouped by the Drip and with a link to the email and to the Drip itself:
Create Drip
Click on the ADD DRIP + button to create a new Drip. In the creation you need to define the email that you want to send, the campaign the Drip belong to and the queryset for the users that will receive it. To see more details, click here.
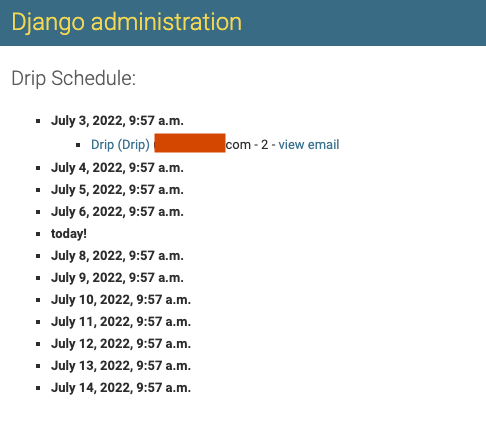
View timeline of a Drip
In the django admin, you can select a drip and then click on the VIEW TIMELINE button to view the emails expected to be sent with the corresponding receivers:
Message class
By default, Django Drip creates and sends messages that are instances of Django’s EmailMultiAlternatives class.
If you want to customize in any way the message that is created and sent, you can do that by creating a subclass of EmailMessage and overriding any method that you want to behave differently.
For example:
from django.core.mail import EmailMessage
from drip.drips import DripMessage

class PlainDripEmail(DripMessage):

    @property
    def message(self):
        if not self._message:
            email = EmailMessage(self.subject, self.plain, self.from_email, [self.user.email])
            self._message = email
        return self._message
In that example, PlainDripEmail overrides the message property of the base DripMessage class to create a simple
EmailMessage instance instead of an EmailMultiAlternatives instance.
In order to be able to specify that your custom message class should be used for a drip, you need to configure it in the DRIP_MESSAGE_CLASSES setting:
DRIP_MESSAGE_CLASSES = {
    'plain': 'myproj.email.PlainDripEmail',
}
This will allow you to choose in the admin, for each drip, whether the default (DripMessage) or plain message class should be used for generating and sending the messages to users.
Send Drips
To send the created and enabled Drips, run the command:
python manage.py send_drips
You can use cron to schedule the drips.
The Cron Scheduler
You may want to have an easy way to send drips periodically. It’s possible to set a couple of parameters in your settings to do that.
First activate the scheduler by adding the DRIP_SCHEDULE_SETTINGS dictionary:
# your settings file
DRIP_SCHEDULE_SETTINGS = {
    'DRIP_SCHEDULE': True,
}
After that, choose:
A day of the week: An integer value between
0-6, or a string:'mon','tue','wed','thu','fri','sat','sun'. The name in the settings isDRIP_SCHEDULE_DAY_OF_WEEK(default is set to0).An hour: An integer value between
0-23. The name in the settings isDRIP_SCHEDULE_HOUR(default is set to0).A minute: An integer value between
0-59. The name in the settings isDRIP_SCHEDULE_MINUTE(default is set to0).
With those values, a cron scheduler will execute the send_drips command every week in the specified day/hour/minute. The scheduler will use the timezone of your TIME_ZONE parameter in your settings (default is set to 'UTC'). For example, if you have:
DRIP_SCHEDULE_SETTINGS = {
    'DRIP_SCHEDULE': True,
    'DRIP_SCHEDULE_DAY_OF_WEEK': 'mon',
    'DRIP_SCHEDULE_HOUR': 13,
    'DRIP_SCHEDULE_MINUTE': 57,
}
Then every Monday at 13:57 the send_drips command will be executed.
Last but not least, add this line at the end of your main urls.py file to start the scheduler:
# your main urls.py file
...
from drip.scheduler.cron_scheduler import cron_send_drips

...
cron_send_drips()
We recommend you to do it there because we know for sure that it’s a file that is executed once at the beginning.
Some tips:
If you want to run the command every day in the week, hour, or minute, just set the corresponding parameter to
'*'.If you want to run the command more than a day in the week, just set the
DRIP_SCHEDULE_DAY_OF_WEEKto more than one value. For example, if you set that to'mon-fri'the command will be executed from Monday to Friday.
Celery integration
IMPORTANT: We use Celery 5.2.2 that supports Django 1.11 LTS or newer versions.
If you need to use celery it can be configured in the same way you just need to add the following key SCHEDULER setted as "CELERY":
DRIP_SCHEDULE_SETTINGS = {
    'DRIP_SCHEDULE': True,
    'DRIP_SCHEDULE_DAY_OF_WEEK': 'mon',
    'DRIP_SCHEDULE_HOUR': 13,
    'DRIP_SCHEDULE_MINUTE': 57,
    'SCHEDULER': 'CELERY',
}
The default value of this key is "CRON", if you enable DRIP_SCHEDULE it will work with a Cron by default.
In order to make this happen, the project’s celery.py setup shall invoke the
autodiscoverttasks
function. This task is scheduled with a simple
Celery beat configuration.
Unsubscribe users from emails
If you need to unsubscribe users from the emails please add the following key DRIP_UNSUBSCRIBE_USERS``set as ``True in the settings file.
We support unsubscribing from Drip, Campaign, and also all emails (all emails sent by this library).
To see more details about changes in Drip create, click here.
Another config is needed here, please add drip urls:
urlpatterns = [
    ...,
    path('drip_unsubscribe/', include('drip.urls'))
]
This configuration will enable 3 views (one for every type of unsubscription) with some dump HTML.
class UnsubscribeDripView(TemplateView):
    template_name = "unsubscribe_drip.html"
    invalid_template_name = "unsubscribe_drip_invalid.html"
    success_template_name = "unsubscribe_drip_success.html"
    ...

class UnsubscribeCampaignView(TemplateView):
    template_name = "unsubscribe_campaign.html"
    invalid_template_name = "unsubscribe_campaign_invalid.html"
    success_template_name = "unsubscribe_campaign_success.html"
    ...

class UnsubscribeView(TemplateView):
    template_name = "unsubscribe_general.html"
    invalid_template_name = "unsubscribe_general_invalid.html"
    success_template_name = "unsubscribe_general_success.html"
    ...
These dump views will be useful for development, if you wish to customize the HTML, please follow this example:
from drip.views import UnsubscribeView

class CustomUnsubscribeView(UnsubscribeView):
    template_name = "custom_template.html"
    invalid_template_name = "invalid_custom_template.html"
    success_template_name = "sucess_custom_template.html"
And then instead of adding the drip urls add the views you customize as the following:
from django.urls import re_path

urlpatterns = [
    ...,
    re_path(
        r"^app/(?P<uidb64>\w+)/(?P<token>[\w-]+)/$",
        CustomUnsubscribeView.as_view(),
        name="unsubscribe_app",
    ),
]
Take a look in drip.urls file to understand how urls are build for all 3 views.
IMPORTANT: Please keep the views name with the same values.